Showing posts with label Crafts. Show all posts

Sunday, April 1, 2012

A "Tractorie" Easter Basket


Crafty-time isn't exclusively girl-time in our house but as DD would typically prefer to spend his time "building Granny's house" in the dirt patches outside, Lola's love of fairies and all things pink tends to take over.  She designed her easter basket before we finished raiding the sale racks at Joann's and had detailed where every last bit of 50% off trim and felt bunny ears would be before the glue gun was fully heated.  DD on the other hand looked at the row of baskets, found a blue one and asked if they had any with tractors on them.  Of course they didn't.  I've never seen an easter basket with a tractor on it but for my boy, I wanted one.  And so our craft began.  


To make a "Tractorie Easter Basket" step one:

A basket with a wide weave is helpful in this craft.  
I used a pre-painted basket because they were on sale (a pre-easter-easter sale...go figure) but typically I would choose to paint my own.  
The felt was cut in a one and a half inch length and "fringed" on half of that (As pictured.)
I used hot glue to fasten it along the bottom rim.

The grass was hot glued all along the base of the basket. 
I cut out the pieces for the tractor: 
the body (in orange) 
two wheels (the back wheel is larger than the front....DD is VERY specific about this)
a little red steering wheel
a thin strip for the "roll-over bar" (again specifics)

 I hot glued the tractor pieces in place.  
You may notice the roll-over bar and steering wheel are now blue....."change-orders" from the tractor-maestro. 
 We added a "Scoop."  I believe this is technically called a "shovel."
 We added a wagon with an Easter Bunny in it.
 He actually loved it so much he yelped when he saw it.  
At the egg hunt, this basket served all purposes...it collected eggs and it made DD happy.  He would have been happy anyway but this was kinda....super cool.  
Hope you try this with your tractor-loving boys at home!  

Thanks for stopping by,
Cammie


Monday, February 27, 2012

Glorious Weather = 25 Toddlers & A Tractor Ride

 The weather on Sunday was glorious with just a hint of cold.  Perfect weather for an influx of fifty guests all invited to celebrate the birthdays of two little boys turning 2 and 4.  Our friend and fellow blogger from Art. Fashion. Furniture. asked to hold the boys party here and we were thrilled except for the looming possibility of cold....but who are we kidding?  It's the "If Winter Don't" of 2012 and I can say for certain, "it don't" and it didn't.  The sun was shiny and the birds were chirpy...Hallelujah.

Lola and I were tasked with coming up with crafts for the kids in the event that it was too chilly for playing in the mud (the past-time for most of our young visitors).  We worked on a few ideas which rapidly became too "girlie" for a boys' birthday party.  Dirt Dog popped in from time to time and mentioned that we didn't need crafts because we have sooooo many tractors.  He had a point.
Still we devised a plan to make little glass "Seed Men" with moss hair and catkin noses.  We were pleased with them and set out supplies for our guests.
Thrilled with the idea of having a birthday at our house Lola kept watch for the first guest hours before they were due to arrive.

"Scoop" at the ready.
 The birthday boys arrived and headed straight for the mud.  No craft could call them away.  Toy tractors, dump trucks, cement mixers, graders and excavators worked in great unison as the adults mingled.  A few stray tots wandered into the studio, grabbed a bowl of popcorn and tried out making a Seed Man....

 Supplies: 
A handful of wildflower seeds
a round glass jar
sheet moss
pussy willow catkin
googly eyes
sparkly glue pen
hot glue gun.....


Completed Seed Man & Seed Woman....Lola improvised.  Go figure.

Soon it was time for the tractor ride.  Short on hay at this time of year the crowd climbed aboard and sat down (or stood), perhaps not so comfortably, around the wagon edge. Saffie steered them around the pond and up the hill where they proceeded to find stuffed animals hidden in the trees.  Dirt Dog was mighty protective of his favorite sea turtle but otherwise fun was had all around.

Upon return, the wild mob rumbled through the studio and back out the other side where they whacked a dinosaur pinata until it relented and spewed forth candy.  High on sugar it was time for a chorus of Happy Birthday.
The boys mom delivered dream cookies complete with John Deere tractors...Dirt Dog about fell off his seat.


MaryBeth of Art. Fashion. Furniture. delivering cookies made by Eizabeth Hoffmann.
As DD likes to say when he sees clear skies and his Daddy readying himself for an outing, "It looks like a "tractory" kind of day!"  It was indeed "tractory", not so flowery, and overall loads of fun.  Happy Birthday H & W and thank you for celebrating with us!

Thanks for stopping by,
Cammie
 

Tuesday, February 21, 2012

Fairy Found in Fake Flower

Last week I was given a fake pink flower.  A pink chrysanthemum on a long green stem.  Lola saw it and assumed it was for her.  A huge hug to my legs and an exuberant "Thank you Mommy!" sealed the deal and she happily took it home.  This the story of where the fake little chrysanthemum found itself within hours of entering our family.


The sound of scissors snipping and Lola singing (she sings all the time but particularly when crafting) alerted me....when this girl hits "craft-mode" there is no stopping her.  Rolls of tape can disappear into thin air, sheets of colorful paper long-since buried in the art drawer appear with renewed vigor and any bit of ribbon or colorful knick-knack is at the mercy of her fast fingers.  The girl keeps time with the pros.


Before long a fairy appeared.  A box top, cut and colored was transformed into the base for a glittery, giddy, curly-eye-lashed fairy who was now in need of hot-glue and a home in the fake chrysanthemum.  She could probably handle it but I draw the line at hot glue and five-year-olds so she lured me in to this part of the task.  
With a very specific set of directions Lola set me to work glueing the fairy into the flower.  I suggested propping it up so it would stand straighter and she smiled.  My suggestion was clearly off-base.

A few rounds of "Away in the Manger" later (she is still singing this from Christmas) and the fairy found its way to her bedroom.  She tucked it into the tiny hole where a finial is meant to go and set to work comforting her sea-otter.

The part that I love is how completely uninvolved I was.  Sure I wielded the hot glue, but only at her specific instruction.  Otherwise I just snapped a few photos and smiled to myself as her humming figure flitted about creating masterpieces and caring for sick otters.


Thanks for stopping by!
Cammie

Wednesday, February 1, 2012

Crafty! The twisted Walking Stick becomes a Love Tree....ah!

Little Lola is getting into the Valentine spirit and asked if we could make a "Love Tree" for her Dad.  Not sure where she came up with the idea of calling it a "Love Tree" but we've been having fun wrapping winter branches lately and why not wrap one in pink and put hearts on it?  Sounds positively "Lovie" to me!

A branch, stripped of its leaves can be a thing of real beauty.  In fact, really examining the lines of a branch (and in that vein, a shrub or a tree) can give you great insight into your four-season interest.  A case in point, Harry Lauder's Walking Stick.  The Walking Stick is the most gnarly, disgruntled looking plant you'll ever have the pleasure of meeting.  It grows quite happily in zones 4 through 8 and though it is a grumpy dwarf, once you gain an appreciation for its branches you will wonder how you ever lived without it.  Take a look at how Little Lola and I transformed this Walking Stick branch for her Dad's Love Tree.....(skip to bottom for list of supplies and Saffie's pictures of the Harry Lauder Walking Stick...he's a big plant nerd).
To start, you will need a branch with an interesting shape (I've also used kousa dogwood with great success)  and yarn, the color of your choice (for Lola and the Love Tree only pink, HOT pink would do).  
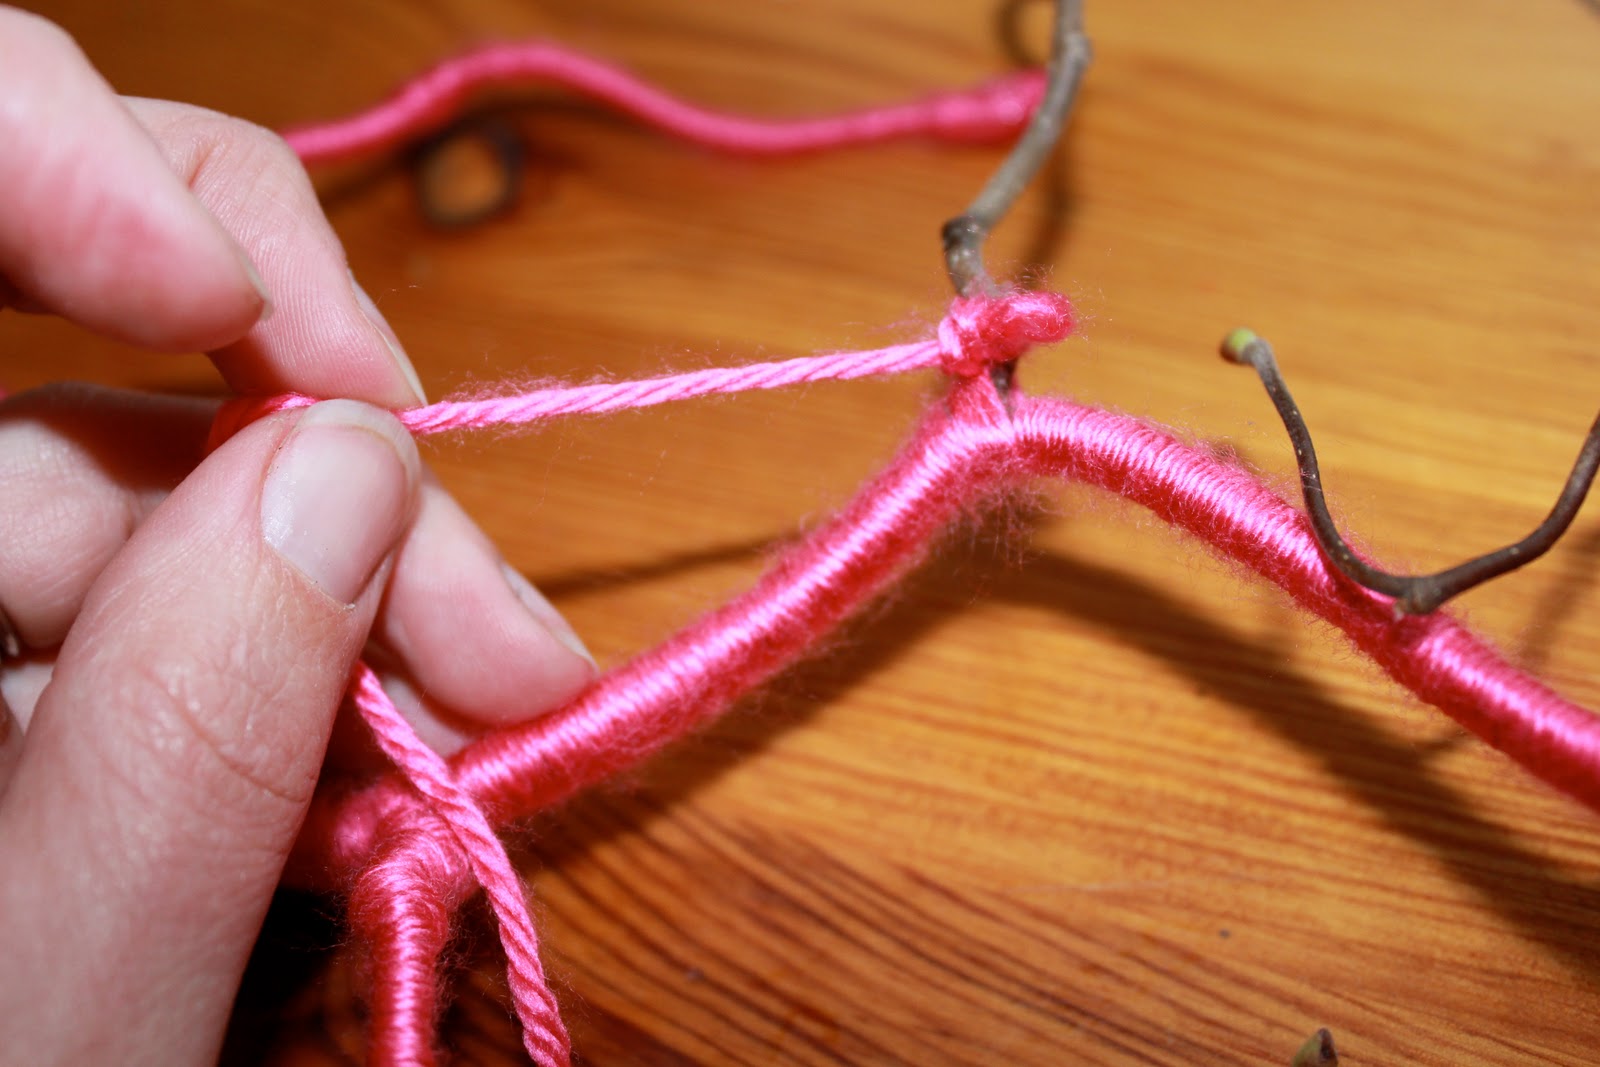
Tie a knot where you want to begin and just wrap around and over the tail of the knot.  Little bumps here and there will not show in the overall look.
When you reach a turning point start a new piece of yarn, again wrapping the tail in.  

Wrapping the branch can be a bit difficult at first, especially when assisting a five year old,  but it really just takes patience.  Understandably, Lola tired of the wrapping after awhile and went to work on some drawings.  
A hot glue gun is a real asset in this craft.  You can just wrap your ends under and trim but if you have access to a glue gun, place a glob of hot glue at the end of your branch and wrap the yarn directly into the "still hot" glue.  It will leave a slightly shiny end which looks lovely overall.  The tip of the glue gun can be used to twirl around the end, spreading out the glue.  Remember not to touch, this is called hot glue for a reason!
Once you have completely wrapped the branch you will want to have these supplies on hand: green sheet moss (I get mine from my floral supplier but you can just as easily gather some from a rock or from under a tree...), dry floral foam (you can find this at any craft store), and a container of approximately a 5 x 5 size....if you want it bigger just make sure the branch you chose is proportionally suited to your choice).
 Cut the foam to fit square in your container.  If you have a little extra room, stuff a smaller piece in so it stays tight.  If you chose a round container, make sure the foam is not wobbling around.  This part will be covered up with moss so don't get overly concerned with appearance here!
Place your branch directly into the foam.
Spread out your sheet moss (this part is a little messy, but easy to clean).
 Add moss around the base of your tree taking care to cover all edges (never let them see your mechanics!)
 For the final details you will need thin jewelry wire and charms or beads (all available in a variety of colors and styles at most craft stores.  We found ours at Joann Fabrics).  The charms will need a hole to thread through.
Wrap the charms with the wire....you may notice a slight difference in technique between mine and Lola's...this is ok.  In my book, a craft with a kid just doesn't look right if it is overly perfect.  


Hang charms from the branches and voila!  It's love on a tree!

   Won't you be our Valentine? 
Thanks for stopping by!
Cammie & Lola

Supply list: 
yarn (hot pink is our favorite!)
small branch with interesting shape
hot glue gun (optional but a real help)
small container (approximately 5 x 5)
small piece of sheet moss (one square foot should be plenty)
dry floral foam
thin jewelry wire (we used pale pink)
small charms or beads (we used glimmery hearts)


Saffie's pictures of the Harry Lauder Walking Stick:
Corylus avellana


Corylus avellana
This ornamental cultivar of common Hazel is widely known as  Harry Lauder's Walking Stick.  The name comes from the great Scottich comedien and singer, Harry Lauder who regularly appeared with a crooked walking stick in hand.


Thursday, January 26, 2012

Crafty is for Dirt Dog's too.

Dirt Dog (the cuddly sweet blond kid I raise to amuse me), is crafty in a different way from his master creater sister, Lola.  Dirt Dog likes to build, and fashion the earth.  He's three.  Today as we arrived home he informed me that he wouldn't come inside right away.  "I have some work to do," he said.  "I have to put the pipes into the house I am building for Granny."  His Granny lives in South Africa and though she has come to visit, it isn't often enough for these two.  He decided to rectify the situation by offering to build her a house.  Over the holidays he diligently laid the foundation, today, he began work on the pipes.

When he isn't working on Granny's house, Dirt Dog is hard at work helping Saffie on his many projects.  The latest is a pathway to our house...hallelujah, we really need a path to our house.   I love this "back to nature" lifestyle but I also love cute shoes.


Sunday, January 8, 2012

Finding Winter Part 2, Catkin Bunny Craft

After gathering hundreds of catkins from the tall pussy willow bushes on the farm, we spent an afternoon at play.   They do truly feel like bunny tails so little Lola's idea to make a bunny seemed appropriate.  We improvised a bit and it turned out adorable.  Let me know if you try one at home!

Step One: the materials....catkins! Hot glue gun. Tweezers. Felt. Sharpie paint pen. Miniature pom-poms. Small styrofoam balls.

Step Two: On felt, draw two bunny ears....
Step Three: Cut out the bunny ears.
Step Four: With a Sharpie Paint Pen color in the center of the ears.

Step Five: Turn over ear and hot glue catkins with a small perimeter of felt showing.

Finished ears back side.
Finished ears front side.

Step Six: Cover small styrofoam ball with catkins using hot glue gun and tweezers.  If working with a child have them pick up the catkins with the tweezers while you help position and apply glue.
Finished catkin ball.


Step Seven: Glue ears in place.
Step Eight: Cut whiskers out of felt and glue in place.  For eyes and nose, use miniature pom-poms (available at most craft stores).


A finished bunny.


Related Posts Plugin for WordPress, Blogger...